- Have any questions?
- +86 19122692420
- info@aiwa-group.com


why does my laptop get so hot?
February 25, 2022
How to add ram to a laptop?
March 3, 2022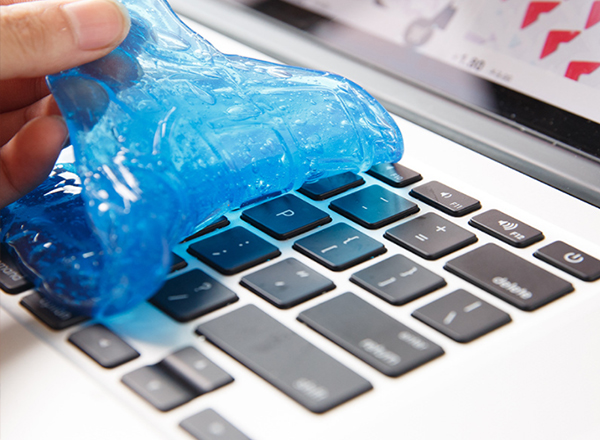
1.How to clean laptop keyboard?
In the modern information society, more and more people choose to use laptops for office and entertainment, and we use laptop keyboards with the highest probability. The accumulation of dust in the keyboard will easily cause damage and affect our normal use. If there is too much dust on the keyboard, you can find a way to clean the dust in the gap of the keyboard, and clean it frequently to maximize the service life of the keyboard.

The keyboard is the most likely part of the laptop to accumulate dust, and if you look at each keycap, you know that it is the best hiding place for dust. Excessive dust will accelerate the corrosion of the conductive rubber of the keyboard, thereby causing damage to the printed circuit of the keyboard. There are many ways to clean up your keyboard, so what's the best way to clean up your keyboard?Next, let's use five different cleaning methods to get the keyboard clean.
Cleaning tools that need to be prepared before cleaning: keyboard cleaner, USB keyboard vacuum cleaner, magic cleaning soft glue, cleaning liquid, leather blower, brush, cleaning cloth.Before any cleaning, power off and unplug your laptop to ensure the safety of the cleaning process. Even if you won't be putting liquids directly on the laptop, you should turn it off completely to ensure that if a small amount of moisture gets inside, it won't damage any products. Shut down the laptop through the Power Options menu and unplug the power cord.
- The first method is to use a keyboard cleaning machine to clean in a horizontal and vertical sequence along the keyboard gap. As shown below:
- The second method is to use a USB keyboard vacuum cleaner for cleaning, and use the USB keyboard vacuum cleaner to sequentially suck along the keyboard gap. As shown below:
- The third method is to use the magic cleaning soft glue to clean, spread the magic cleaning soft glue, and adsorb along the keyboard surface and the gap. As shown below:
- The fourth method is to use cleaning liquid, leather blower, brush, and cleaning cloth to clean, use leather blower and brush to clean the large particles of dust in the gap of the keyboard, and then spray the cleaning liquid on the cleaning cloth (do not spray directly on the cleaning cloth). on the keyboard). Use a cleaning cloth to wipe dust off the keyboard surface. As shown below:
- The fifth method is to use the keyboard membrane to cover it to prevent dust and water from entering, and to ensure that the keyboard is clean and clean. As shown below:


- Turn the laptop upside down and tap or shake it gently. This will remove any large dust bunnies, crumbs, or other debris hiding in the crevices of the keyboard. By removing bulky items first, it will be easier to do a more detailed cleaning later.
- Spray the dust between the keys with compressed air. Be sure to connect the straw to the compressed air tank before use. Tilt the keyboard to one side and spray briefly between the keyboards, moving from one side of the keyboard to the other. The force of the air will remove any debris between and under the keys.
- Wipe the keys with a damp microfiber cloth. Microfiber attracts dust easily, so a quick swipe of the keys can help remove any buildup of dirt from the keyboard. You can lightly dampen a cloth with a little water if desired, but make sure to wring it out completely and clean only the tops of the keys to keep the inside of the laptop from getting wet.
- Remove stubborn dirt with a cotton ball dipped in isopropyl alcohol. Alcohol evaporates quickly, making it a safe alternative to using water on your laptop. Also, alcohol is especially good at removing oily residue from your fingers. Just be sure to always apply the alcohol to the cotton ball first, never pour it directly on the keyboard.
- Wipe the keys with disinfecting wipes to kill germs. If you are concerned about germs, such as after a cold or when using a shared computer, you can wipe down the surface of the keys to disinfect. However, do not use wipes with bleach, as they can damage the protective coating on the keys.
- Search your laptop model online to see if the keys are off. On some laptop models, the keycaps can be gently pryed off so you can access the surface beneath the keys. However, the keycaps on some laptops are permanently attached. Do an online search to determine if and how the key can be removed.
- Remove the keys only if you really need to clean the underside of the keys. Even though they are removable, the keycaps are held in place by small pieces of plastic that are easily damaged. To avoid damaging the keyboard, avoid removing the keys unless the keyboard is particularly dirty.
- Before taking out the key, please take a picture of it. This ensures that you don't forget to put the keys back where they were! While it may be easy to remember the order of the number and letter keys, your keyboard may have special characters and function keys, and it's easy to confuse them.
- Use a small flat tool to pry off the key. Slide the edge of the tool under the bottom of the key and gently pry up. The keycaps should pop out easily. If not, don't force it, or you may permanently damage the keyboard.
- Wipe under the keys with a microfiber cloth or a cotton swab dipped in alcohol. Since the inner workings of the laptop are exposed without the keycaps, avoid using any liquid to clean under the keys. If you do need to address stickiness, you can dip a cotton swab in a little rubbing alcohol and carefully rub the area.
- Reinstall the keycaps. Place each keycap on its designated space, making sure the sides are properly aligned. Starting at the bottom edge, gently press down on the key until you feel it snap into place.


2.how to clean a laptop screen

We are in close contact with laptops countless times a day. The notebook PC shell is exposed for a long time, and it is also the most vulnerable place. It is not only easy to scratch, but also easy to leave stains. Dust, fingerprints, and unsightly scratches on the screen can affect the use of a computer monitor. Since the material of the display is a special plastic, it is easily scratched by harsh cleaners or chemicals, so use a mild cleaner. This article will show you how to clean your computer monitor and fix scratches without causing any damage.
According to the screen hardness, the laptop display screen can be divided into IPS and TN screens. IPS is a hard screen, the color effect is stronger than the TN screen, and the price is higher. TN screens are called soft screens and are faster than IPS in response time.
Notebooks cannot avoid more or less scratches, fingerprints and other stains. So, what problems should be paid attention to when cleaning the fuselage stains?Regular cleaning, frequent cleaning is very simple, but the hardest to stick to. It is recommended to find a time period, it only takes five minutes, you can wipe the notebook again, dress up your love machine, and give yourself a good mood~ Cleaning cloth The cleaning cloth should not be too rough, otherwise it is easy to leave fine scratches on the casing. In particular, do not wipe with paper towels.
Important thing to say three times: don't use paper towels! Don't use paper towels! Don't use paper towels! Wiping the case with a paper towel is equivalent to wiping kitchen utensils with a steel wool, imagine this scene, and a 1 second of silence for your notebook!
Before you start cleaning your laptop screen, Turn off the display. This makes it easier to see dust and dirt, and it's safer for you and your computer.
- If you clean the monitor while it's on, you may damage the monitor.
- Although the risk is small, there is a risk of electric shock if you clean the monitor with it on
- Clean the case
- The case is made of durable plastic, so you can rub it hard if you need to remove some grime.
- Don't spray the cleaner directly on the case, as you could accidentally spray it on the screen, and some could run into the crevices.
- Clean the base of the monitor, buttons, and the back of the monitor. You can use a cloth to wrap your fingers or a toothpick to clean any crevices or corners.
- If the monitor has wires connected to the CPU or power supply, unplug these and give it a good clean.
You can use a spray cleaner or a cleaning cloth moistened with a mild cleaning solution to wipe down the casing around the screen.
Wipe the monitor with a clean, soft cloth. Microfiber cloth works better. This type of anti-static wiring has fins left on the screen and is soft enough not to scratch the surface. Any visible dust, dirt and grime can be removed with this cloth.

- Do not wipe the screen with a towel, paper product, or other rough cloth. This leaves cotton fibers and can cause scratches.
- Disposable dusting cloths, such as Swiffer cloths, also work well.
- Do not press hard on the screen or wipe hard. You may damage the screen and discolor when you turn it on.
- If your screen is very dirty, you can rinse or change a cloth. Clean gradually and gently.
- Use plain water whenever possible when wiping the screen.Avoid products containing ammonia and acetone. These substances can easily damage your screen, especially an anti-glare screen.
- Buy a professional screen cleaner. Check your owner's manual to make sure it's safe for your monitor.
- You can also make your own mild cleanser by mixing water and equal parts white vinegar. Dab some cleaner on a cleaning cloth (not too wet).
- You can also mix in an equal dose of vodka or isopropyl alcohol as another cleanser.
- Try to wipe with a cloth dipped in liquid, do not pour the liquid directly on the monitor to prevent it from flowing into the gap.
- Do not use soap or there will be residue.For some stubborn stains, you can lightly wipe the screen. Gently rub the stain, whether it's sticky food scraps, ink, or something else, in a circular motion.
- Don't wipe too hard.
- Be patient, the stain may take a few minutes of soaking in the cleaner to remove completely.
- You can use a cloth dampened with some cleaner to leave on the stained area for a while.
- Avoid spraying the cleaner directly on the screen.
- After the stain has been removed, wipe again with a dry cloth.
- Try not to use household rags or ordinary paper towels to clean up. The former is likely to contain pollutants or sand particles when cleaning other things at the same time, but it will stain or even scratch the screen, while the latter (in fact, also includes ordinary rags) because of fluff, etc. Therefore, it is basically unclean (the screen will still see fluff on the screen after cleaning), which can only be used for emergency.
If your laptop With LCD screen,The LCD screen is the most delicate component on the notebook computer, and its manufacturing cost accounts for about 30% of the total cost of the entire notebook computer. It has many advantages such as "low power consumption, no radiation, no dizziness", and protects the user's eyesight to a great extent. However, if it is used improperly, it is likely to shorten its service life, so special attention should be paid to the maintenance of the LCD screen. Below, the author will introduce the maintenance and maintenance methods of the laptop LCD screen into several points.
- Maintain a dry working environment According to the working principle of the LCD screen of the notebook computer, we can see that it has strict requirements on the air humidity, so it is necessary to ensure that the notebook computer can work in a relatively dry environment. In particular, moisture cannot be brought into the interior of the display, so this is especially critical for some users who work in a humid environment. If moisture has entered the LCD screen, you need to place the laptop in a dry place to allow the moisture to evaporate slowly. At this time, do not turn on the power rashly, otherwise the LCD electrodes of the display screen will be corroded. This will cause damage to the LCD screen.
- Pay attention to your own operating habits Bad work habits can also damage the health of the LCD screen. For example, drinking tea, coffee, or milk while using a laptop. Everyone knows that doing so will not only endanger the safety of the laptop keyboard, but also endanger the delicate LCD screen. If you accidentally spill tea and other liquids on the LCD screen, the consequences can be imagined. In addition, if you are not careful when using or opening the laptop, it may cause scratches on the LCD screen or damage the protective film of the display screen, etc., affecting its service life. Therefore, good operating habits are closely related to the health of the laptop LCD screen.
- Avoid unnecessary vibration Since the LCD screen of a laptop computer is composed of multiple layers of reflectors, reflectors, filters and protective films, and these materials are very fragile and easily damaged, excessive vibration may cause irreparable damage to it. Damage, such as display blur, water ripples and other phenomena, thus affecting the display output effect. Therefore, when using the notebook computer, you should avoid places with strong vibrations to ensure the safety of the LCD screen.
- avoid the infringement of volatile chemicals No matter what kind of display, you should keep away from liquids, let alone chemicals? What I want to emphasize here is to pay attention to the damage of other volatile chemicals to the LCD screen. For example, the hairspray that everyone often uses, the mosquito repellant that is frequently used in summer, etc., will cause damage to the liquid crystal molecules on the LCD screen and even the entire display screen, resulting in a shortened service life of the LCD screen. So, dangerous volatile chemicals are also a problem we need when using laptops.
- Regularly clean the LCD screen Due to unclean substances such as dust, some unsightly stains will inevitably appear on the LCD screen, so the screen should be cleaned regularly. If you find stains on the LCD screen, the correct cleaning method is to wipe off the stains with a soft cloth dipped in a little glass cleaner. Be careful when wiping, otherwise the LCD screen will be short-circuited and damaged. It is necessary to clean the LCD screen regularly, and frequent scrubbing is not allowed, which will also cause adverse effects on the LCD screen.
- Use a screen saver during intermittent use Like CRT monitors, long-term work, especially when a fixed picture is displayed for a long time, may cause the inside of the LCD screen to age or even burn out, and the damage is irreparable. Therefore, in the interval of use, setting a screen saver can also prolong its service life.
The LCD screen is the "face" of the notebook computer, and users have to work with it most of the time. Therefore, protecting the LCD screen is a very important issue that deserves attention. If you can do the above points in normal use If so, its service life will also increase.by the way, the above cleaning methods and supplies also work for most desktop computers.
3.How to clean laptop fan
Laptops, as "highly intelligent" appliances, are quite sensitive to temperature, and high temperature will seriously affect the performance and user experience of the notebook. The result is a significant drop in notebook performance. And the most terrifying thing is that if the notebook finds that the frequency reduction still cannot help the notebook "cool down", the notebook will directly shut down to notify you of its "anger". Suppose you are making a complex PPT or doing your graduation thesis at this time, then the consequences are unimaginable.

For laptop computer users, the easiest way to cool down is to clean the fan. The cleaning time of the fan depends on the usage environment. It is calculated according to the normal cleaning time of the laptop. It should be at least once every six months. The fan often speeds up and makes abnormal noises, so first of all, you should take the method of cleaning the notebook fan to solve the problem of excessive temperature.
Laptop fan cleaning is very simple for people who have a certain disassembly foundation, but novices may encounter many problems, such as fear of the consequences of disassembly, not knowing where to use force to remove accessories, and so on. The author will give you a detailed and clear step today to help you complete the cleaning of the notebook fan together. However, there are some differences between notebooks, and today's demonstration is only for general teaching use.Then, please prepare anti-static rubber gloves, screwdrivers, silicone grease and other cleaner before cleaning.
- Remove static electricity and wear rubber finger cots This step can be collectively referred to as the protection work before the notebook is disassembled. I have already explained the reasons for the protection very clearly, mainly to prevent electrostatic breakdown. Netizens can use rubber gloves or insulating gloves instead.
- Removing the Notebook Protective Back Cover and Unplugging the Battery
- Remove the laptop CPU and GPU heat sink screws
- Disassemble the notebook fan
- Clean the laptop fan
- Apply silicone grease
 The back cover of the notebook pc plays a protective role and is the heart of the entire notebook protection, because it protects the most important CPU and GPU of the notebook, so be extra careful when disassembling, do not use too much force to avoid damage to the protective plate. It is important to note that the material of the protective plate of some notebooks is very thin, and brute force should not be used to remove such protective plates. Before disassembling the notebook, the battery must be removed to avoid damage when touching the chip.
 When dismantling the protective back cover of the notebook, you will see the CPU and GPU. These two chips are the heart of the notebook and the core components that provide us with performance and graphics display. Therefore, we must be more careful when dealing with them. Don’t be impatient. The internal design of each series of notebooks is different, so there may be slight discrepancies, which must be carefully observed before dismantling.
 Generally speaking, notebooks with discrete graphics cards will have two copper pipes to help the CPU and GPU dissipate heat. These two copper pipes are very important. When removing the fan, be sure to use force at the bottom of the two copper pipes, otherwise deformation and breakage may occur.
 The notebook fan is the focus of this cleanup. The author's notebook has been placed in the office, so there is not a lot of dust, but dust is a killer for notebook accessories.
 The function of the silicone grease is to make up for the gap between the heat sink and the notebook chip, so as to achieve the best heat dissipation effect, so be sure to pay attention to the smoothness when smearing. The more silicone grease is applied, the better, just a flat layer That's it. Since silicone grease contains silver, do not get silicone grease on notebook circuit boards.
The entire notebook fan cleaning process is relatively simple, and there are no technical difficulties, but it will be very nervous for netizens who clean the fan for the first time. This is a normal process, and there are many places that need to be paid attention to when cleaning, such as CPU and GPU. Chips, damage to these parts will cause the notebook to fail to turn on.
The notebook and its own internal structure are very fragile, so you should pay special attention when disassembling or installing, because one of your actions determines the fate of the notebook, but as long as there are correct operation steps, the notebook can be effectively avoided. damaged. Boldness is the standard quality of a notebook gamer. Below we have summarised a few things to keep in mind.
- Effectively clean up static electricity in hands
- Any notebook will have certain skills when disassembling and assembling, do not use brute force
- Arrange the screws to avoid loss and failure to reset
- Do not apply too much silicone grease
- When installing the notebook CPU screws, be sure to install them in diagonal order.
- The tightness of the notebook CPU screws is 50%
How to clean a laptop fan without taking it apart?
The best way to clean a laptop without taking it apart is to use compressed air. It's cheap, readily available, and offers the safest and easiest way to get dust and debris out of your laptop without taking it apart or opening.
In our example, we'll be using a can of compressed air because you're more likely to have or have access to it. It is not recommended to blow into the vents yourself (with your mouth) as moisture and possibly liquids can get into the laptop.
- Shut down your laptop and unplug it from the charger. If you can, remove the laptop's battery.
- Locate the fan vents on the laptop. They are usually below, but it depends on the make and model of the laptop. When in doubt, consult the manual or manufacturer's website.
- Point the compressed air nozzle at the vent, but don't push it too far and let out a short burst of air. Aim for the other vent and do the same. If you have the option, blow compressed air directly onto the fan blades.Due to the extremely low temperature of the expanding air, there is a danger of condensation during prolonged pressing. Stick to short pulses only.
- If your laptop fan is particularly dirty or clogged with dust, you can also blow compressed air through the exhaust. They're usually on the side or rear of the laptop, though this depends on the make and model.

The next time you open the laptop, you may see some dust escaping from the laptop as it was released from the compressed air. For a deep clean, turn off and repeat the above steps.
How Often Should You Clean Your Laptop Fan?If using compressed air, a quick blow every six months is enough to keep your laptop cool and running at peak performance. If you plan to take it apart, only do so when absolutely necessary to avoid possible damage or problems when reassembling.
What's the easiest way to clean a fan?Compressed air is by far the easiest way to clean a laptop fan, although it's not the only way.